
host_hid_mouse#
Overview#
This Host HID example is a simple demonstration program based on the MCUXpresso SDK.
The application supports the mouse device. It prints the mouse operation when the mouse device is attached.
System Requirement#
Hardware requirements#
Mini/micro USB cable
USB A to micro AB cable
Hardware (Tower module/base board, and so on) for a specific device
Personal Computer (PC)
Software requirements#
The project path is:
<MCUXpresso_SDK_Install>/boards//usb_examples/usb_host_hid_mouse/ / .
The
is Bare Metal or FreeRTOS OS.
Getting Started#
Hardware Settings#
Set the hardware jumpers (Tower system/base module) to default settings.
Prepare the example#
Download the program to the target board.
Power off the target board and power on again.
Connect devices to the board.
For detailed instructions, see the appropriate board User’s Guide. Host hid example doesn’t support HID report descriptor analysis, this example assume that the device data are sent by specific order.
For more detail, please refer to the code. For the device list we tested,
please refer to chapter “Peripheral devices tested with the USB Host stack” in “SDK Release Notes xxxx(board name)”.
Run the example#
Connect the board UART to the PC and open the COM port in a terminal tool.
Make sure to use a USB HUB or an adapter with OTG functionality firstly, then plug in the mouse device to the board. The attached information prints out in the terminal.
The mouse operation information prints in the terminal when you operate the mouse.
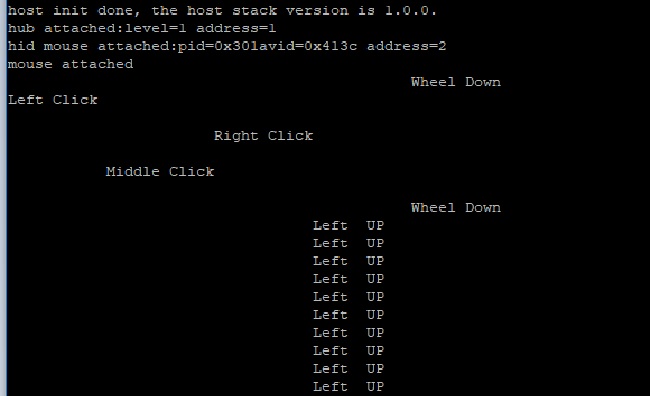
The application prints the mouse operation information in one line. Each line contains the following sequential string: “Left Click”, “Middle Click”, “Right Click”, “Right”/”Left” movement, “UP”/”Down” movement and “Wheel Down”/”Wheel Up” movement. White space replaces the above string if the mouse doesn’t have the corresponding operation.
For example, when the mouse moves right and up,
" Right UP "
prints in the terminal.
The following figure is an example to attach one mouse device.
Supported Boards#
FRDM-K22F
Getting Started
Hardware Settings
The Jumper settings:\n J22 1-2.
LPCXpresso55S69
Getting Started
Hardware Settings
The Jumper settings:\n J6 1-2 and J7 open for high speed mode, J6 2-3 and J7 shunt for full speed mode.
The external +5V power only port shoud be connected with a power USB cable to provide USB VBUS.
MIMXRT685-AUD-EVK
Run the example
This hardware supports battery charger and USB_HOST_CONFIG_BATTERY_CHARGER is enabled, The charger type can be changed by pressing one button.
(1) Press the button one time to change the charger type and turn off vbus.
(2) Press the button again to turn on vbus, then the attached device can detect the changed charger type.
(3) The button name will be printed after initialization.
LPCXpresso54S018
Getting Started
Hardware Settings
The Jumper settings:\n J9 1-2 high speed mode,2-3 full speed mode; J10 open high speed, shunt full speed; J11 2-3, J12 2-3, J13 2-3 , need provide external power through J1.
LPCXpresso55S16
Getting Started
Hardware Settings
The Jumper settings:\n JP20 1-2, JP21 1-2 and JP22 1-2 for chip power. JP2 1-2 and JS2 shunt for full speed mode, JP2 2-3 and JS2 open for high speed mode.
The external +5V power only port shoud be connected with a power USB cable to provide USB VBUS.
LPCXpresso54S018M
Getting Started
Hardware Settings
The Jumper settings:\n J9 1-2 high speed mode,2-3 full speed mode; J10 open high speed, shunt full speed; J11 2-3, J12 2-3, J13 2-3 , need provide external power through J1.
LPCXpresso55S28
Getting Started
Hardware Settings
The Jumper settings:\n J6 1-2 and J7 open for high speed mode, J6 2-3 and J7 shunt for full speed mode.
The external +5V power only port shoud be connected with a power USB cable to provide USB VBUS.
LPCXpresso54628
Getting Started
Hardware Settings
The Jumper settings:\n J9 1-2 high speed mode,2-3 full speed mode; J10 open high speed, shunt full speed; J11 2-3, J12 2-3, J13 2-3 , need provide external power through J1.
MCX-N5XX-EVK
Getting Started
Hardware Settings
The Jumper settings:\n J21 1-2.
FRDM-K32L2A4S
Getting Started
Hardware Settings
The Jumper settings:\n J9 1-2, J16 1-2.
EVK-MIMXRT595
Run the example
This hardware supports battery charger and USB_HOST_CONFIG_BATTERY_CHARGER is enabled, The charger type can be changed by pressing one button.
(1) Press the button one time to change the charger type and turn off vbus.
(2) Press the button again to turn on vbus, then the attached device can detect the changed charger type.
(3) The button name will be printed after initialization.
EVK-MIMXRT685
Run the example
This hardware supports battery charger and USB_HOST_CONFIG_BATTERY_CHARGER is enabled, The charger type can be changed by pressing one button.
(1) Press the button one time to change the charger type and turn off vbus.
(2) Press the button again to turn on vbus, then the attached device can detect the changed charger type.
(3) The button name will be printed after initialization.
MCX-N9XX-EVK
Getting Started
Hardware Settings
The Jumper settings:\n J21 1-2.
IMX952-EVK
Getting Started
Hardware Settings
The Switch settings:\n Set SW9_1(USB2_SEL)=0.