
Tutorials#
This chapter contains step-by-step tutorials for common GUI Guider tasks. Each tutorial is independent and can be followed on its own.
How to use symbols#
There are two ways of using symbols in GUI Guider:
Use the built-in symbols in the attribute setting window.
Write custom code to use custom symbols.
The following steps introduce how to use symbols in both ways. First, create a GUI Guider project and add a label into the screen.
Use GUI Guider built-in symbols#
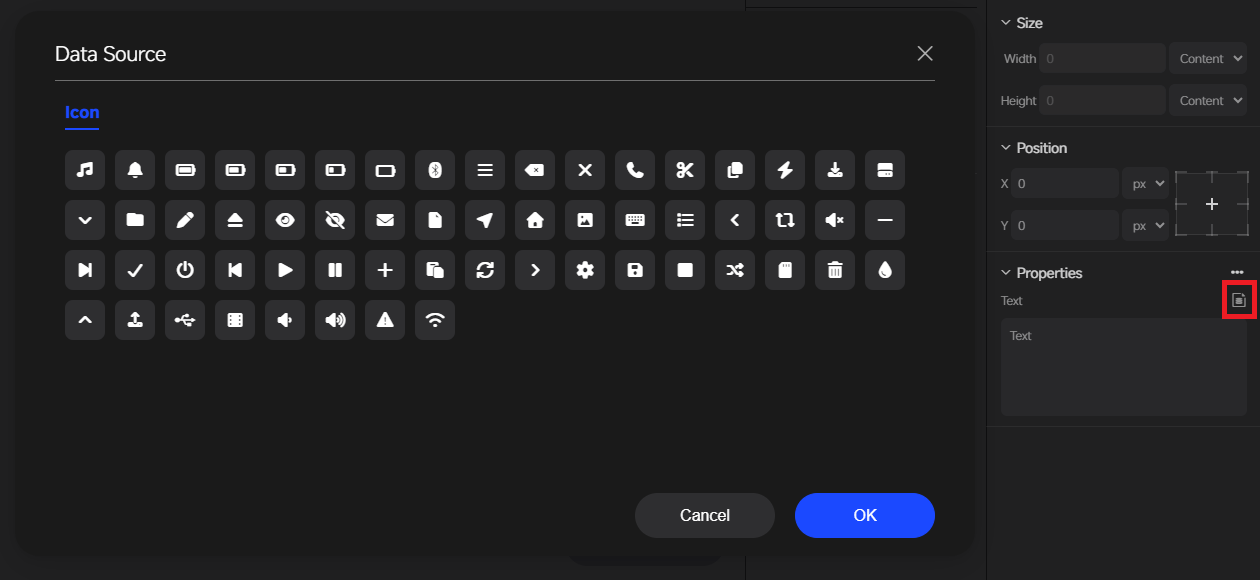
Click the data source icon to open the built-in symbol list and select a symbol. The font family must be FontAwesome, which is the default.
Use custom symbols#
Search the symbols to be used from https://fontawesome.com. For example, choose the crow, and copy the unicode ID, which is
0xf520.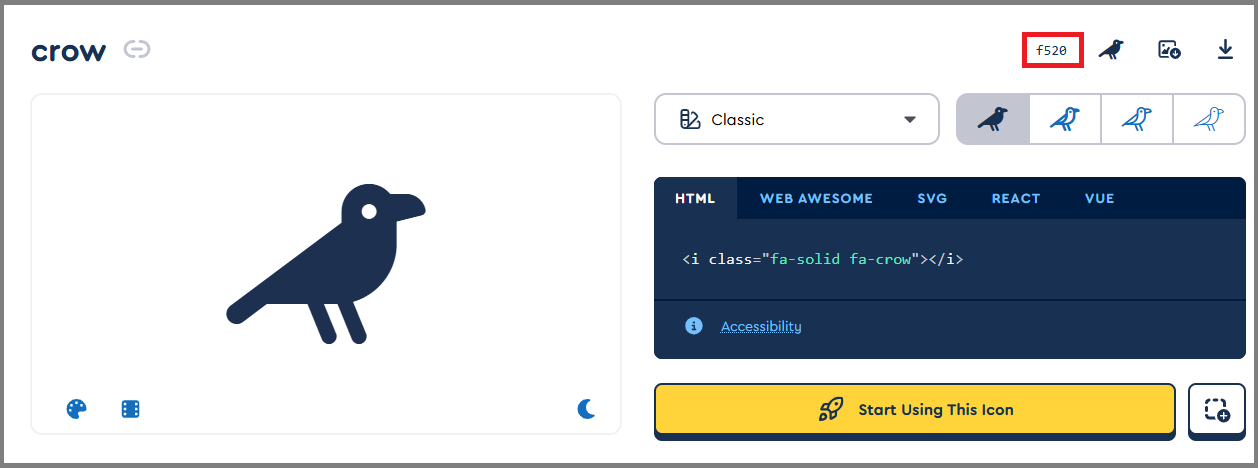
Convert this symbol to a C file on the resource font converter, and set parameters, including size, BPP, and font file (
FontAwesome.woff). By default, the generated font C file is placed in the project’scustomfolder, with a name such aslv_font_FontAwesome7_24.c.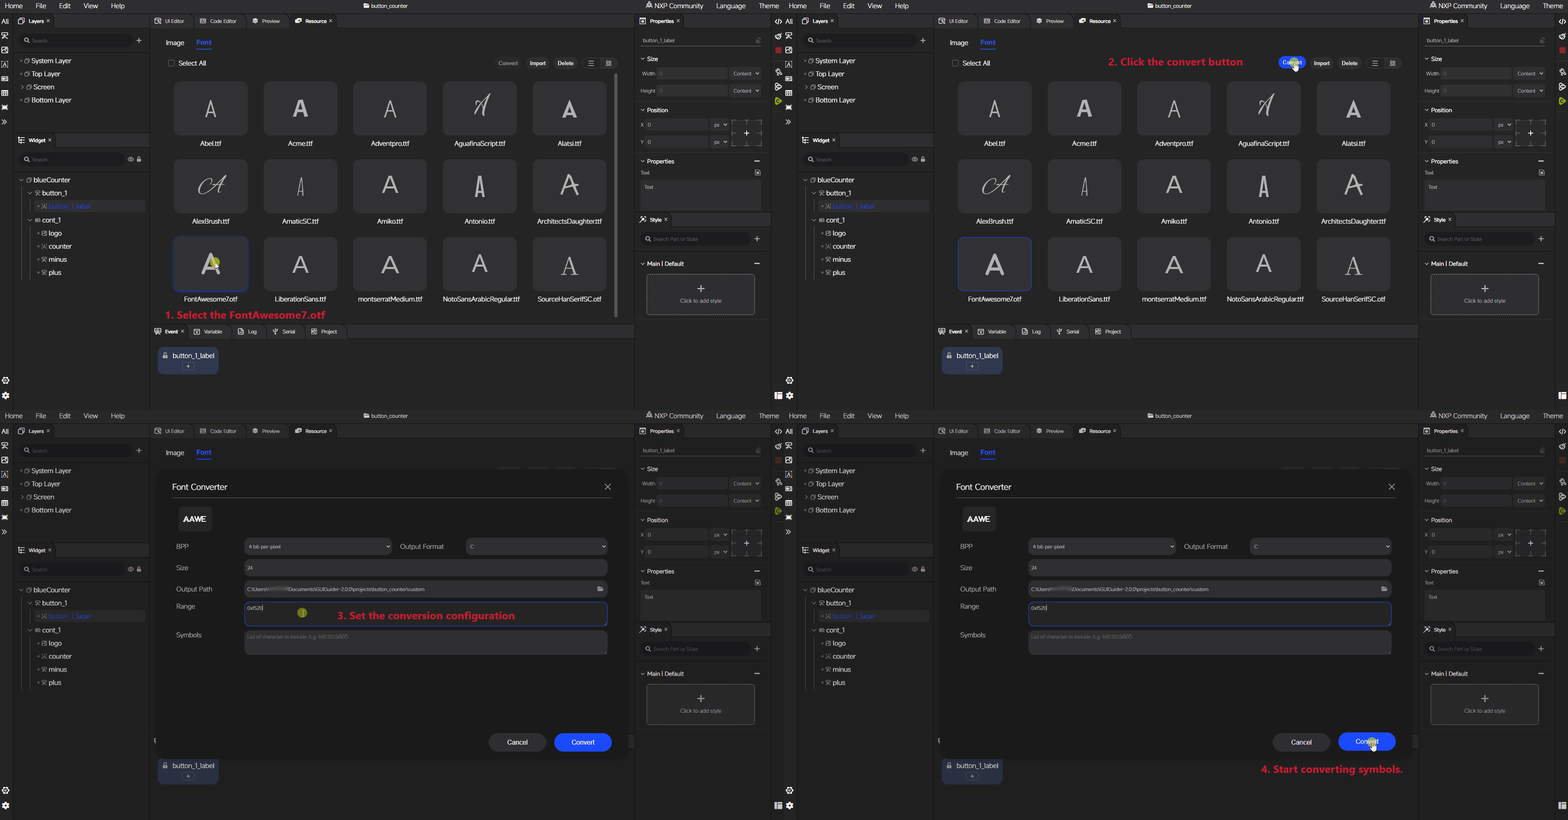
Convert the unicode value to UTF-8. For
0xf520, the Hex UTF-8 bytes areEF 94 A0.Define the symbol string to UTF-8 values in
custom.h.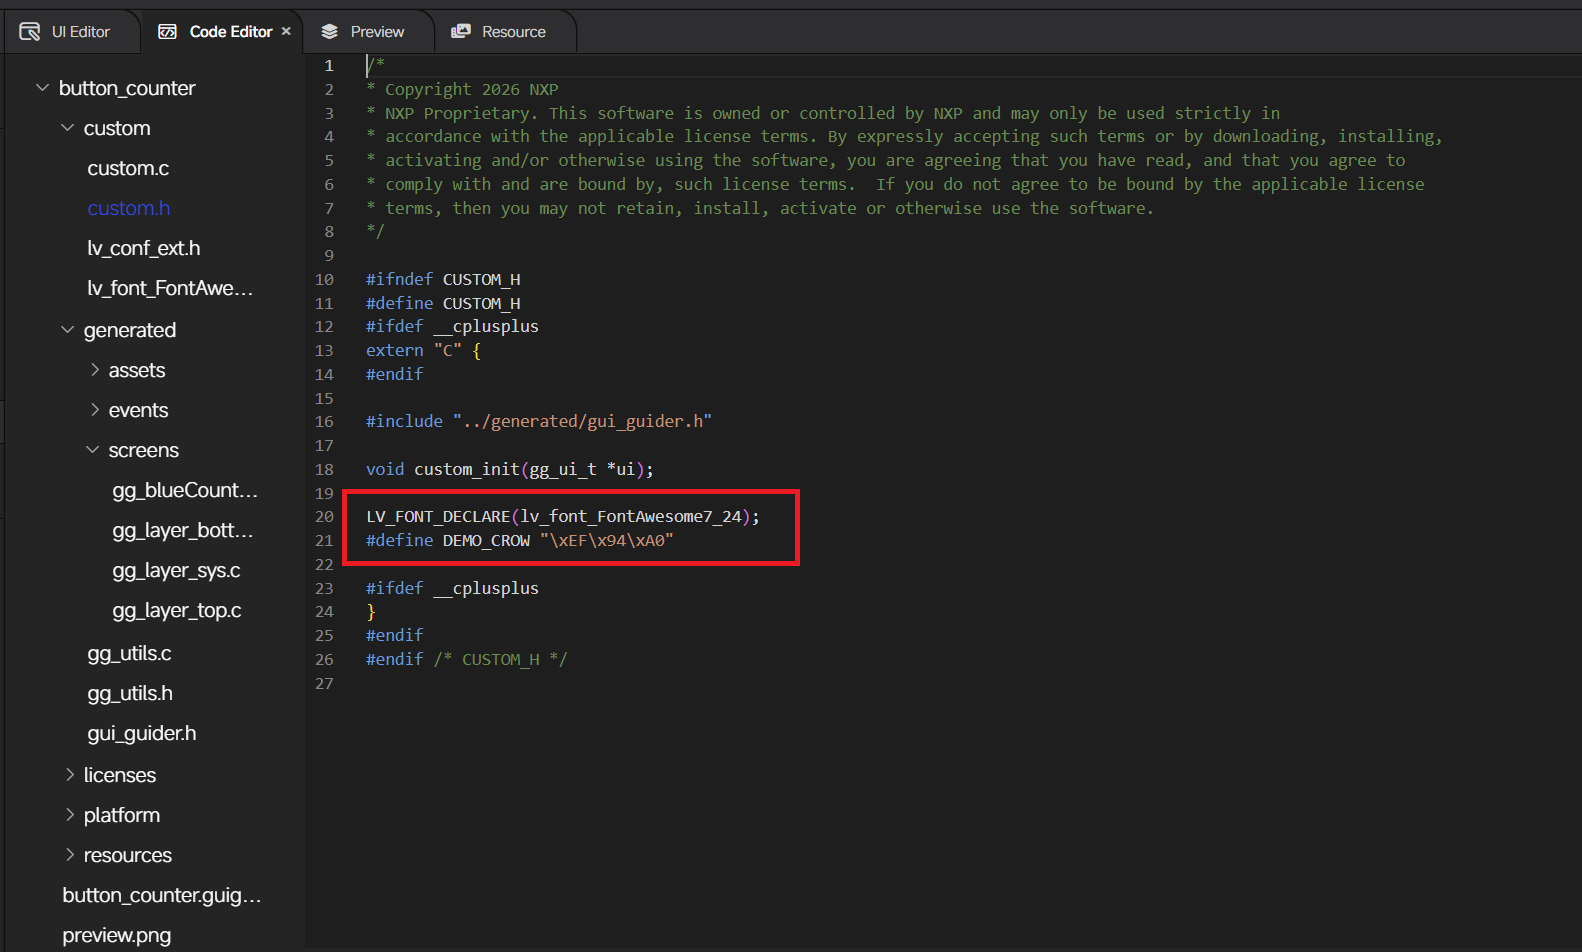
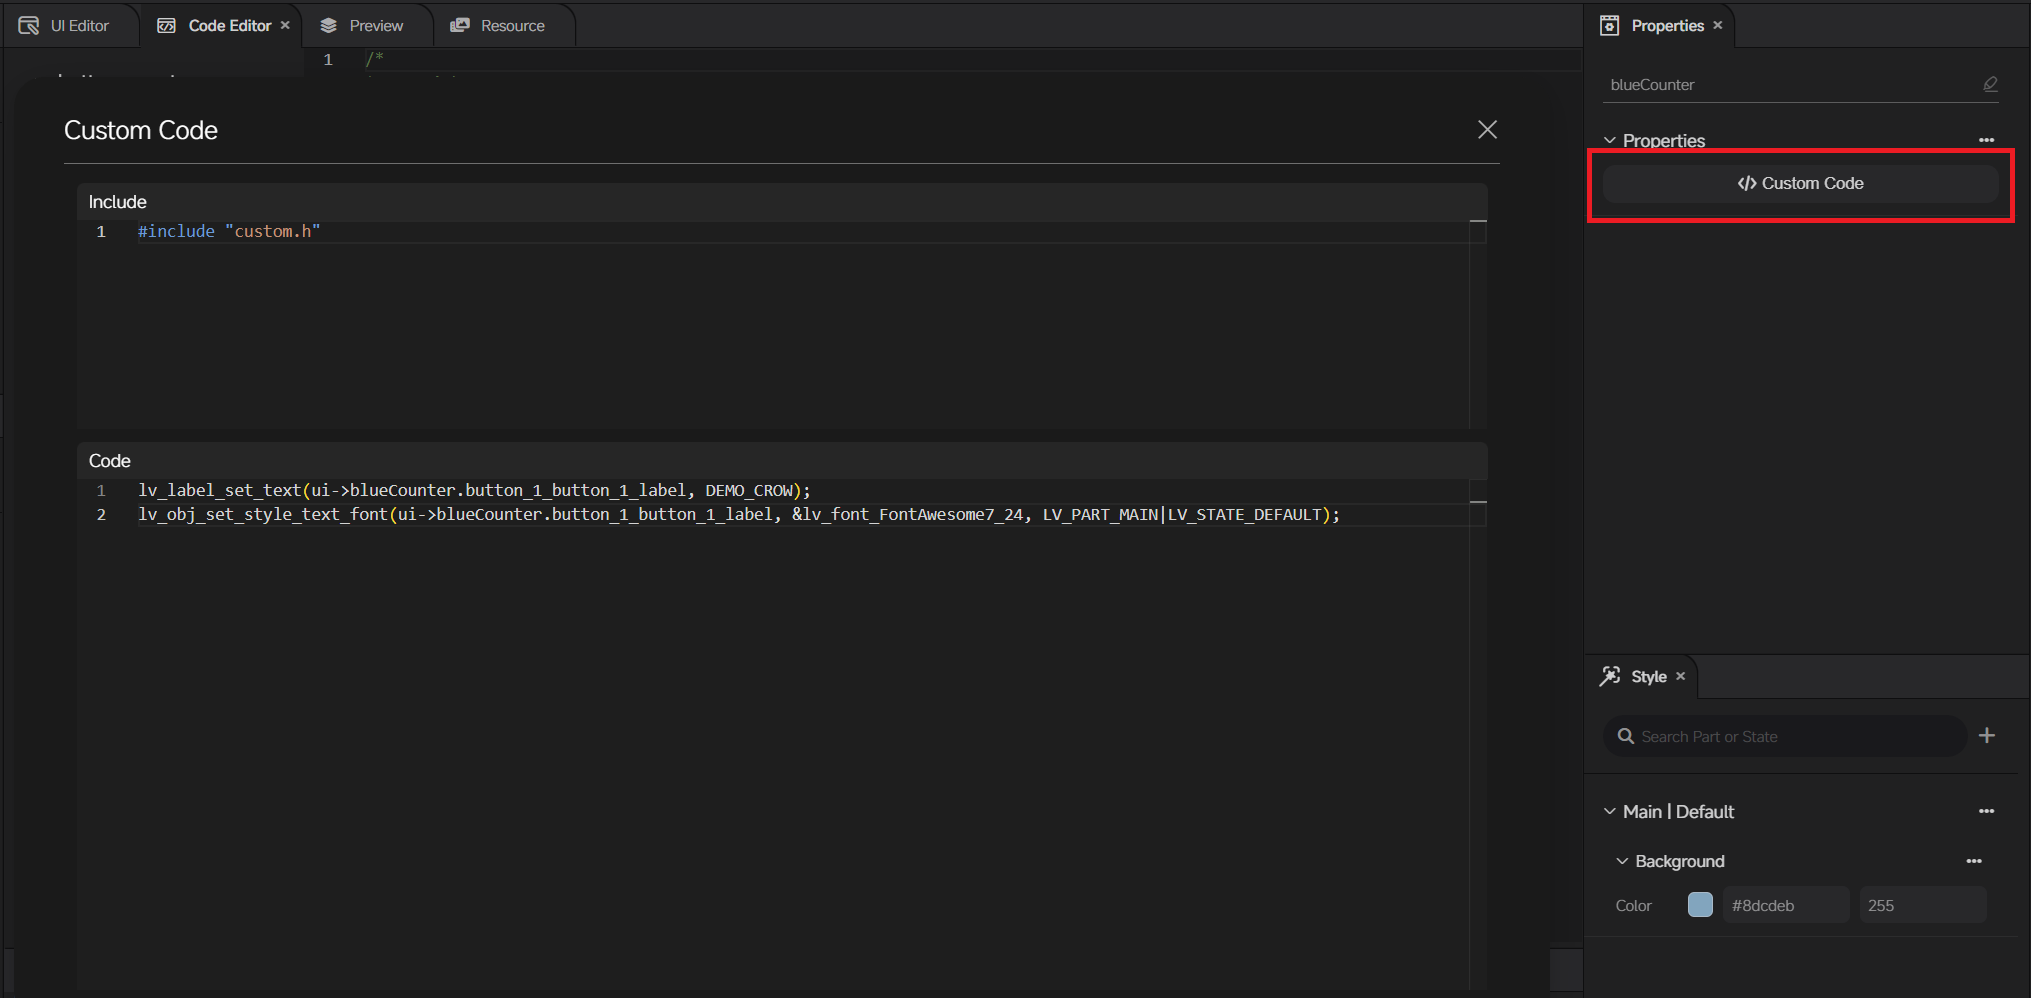
Use the symbol in the GUI Guider project by adding the following code to redefine the label font text and font style in the screen custom code window.
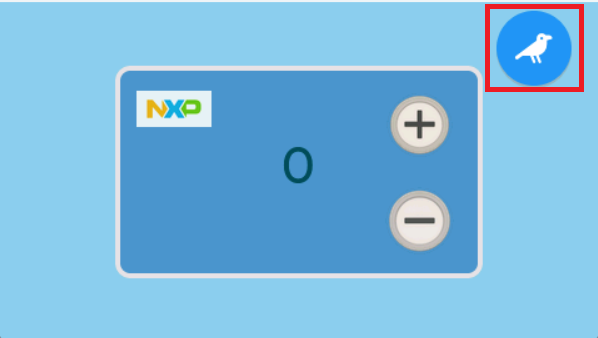
Build and run the project. The custom symbol is displayed in the label widget.
Rotate screen and widgets#
This chapter describes how to rotate the panel of i.MX RT1060EVKC from landscape mode to portrait mode using PXP. To support the rotate panel, update the flash display function in platform\armgcc\examples\lvgl_examples\lvgl_sdk\lvgl_support\lvgl_support.c.
The following example shows how to update the flash display function:
static void DEMO_FlushDisplay(lv_display_t *disp_drv, const lv_area_t *area, uint8_t *color_p)
{

#if DEMO_USE_ROTATE
    void *inactiveFrameBuffer = s_inactiveFrameBuffer;
    DCACHE_CleanInvalidateByRange((uint32_t)inactiveFrameBuffer, DEMO_FB_SIZE);

    ELCDIF_SetNextBufferAddr(LCDIF, (uint32_t)inactiveFrameBuffer);
#if LV_USE_ROTATE_PXP /* Use PXP to rotate the panel. */
    lv_draw_pxp_rotate(color_p, inactiveFrameBuffer,
                       ROTATED_FB_WIDTH, ROTATED_FB_HEIGHT,
                       DEMO_FB_STRIDE(ROTATED_FB_WIDTH),
                       DEMO_FB_STRIDE(ROTATED_FB_HEIGHT),
                       LV_DISPLAY_ROTATION_90,
#if (LV_COLOR_DEPTH == 32)
                        LV_COLOR_FORMAT_XRGB8888
#elif (LV_COLOR_DEPTH == 16)
                        LV_COLOR_FORMAT_RGB565
#else
                        LV_COLOR_FORMAT_RAW
#endif
                        );
#else /* Use CPU to rotate the panel. */
    lv_draw_sw_rotate(color_p, inactiveFrameBuffer,
                       ROTATED_FB_WIDTH, ROTATED_FB_HEIGHT,
                       DEMO_FB_STRIDE(ROTATED_FB_WIDTH),
                       DEMO_FB_STRIDE(ROTATED_FB_HEIGHT),
                       LV_DISPLAY_ROTATION_90,
#if (LV_COLOR_DEPTH == 32)
                        LV_COLOR_FORMAT_XRGB8888
#elif (LV_COLOR_DEPTH == 16)
                        LV_COLOR_FORMAT_RGB565
#else
                        LV_COLOR_FORMAT_RAW
#endif
                        );
#endif
#else

    DCACHE_CleanInvalidateByRange((uint32_t)color_p, DEMO_FB_SIZE);

    ELCDIF_SetNextBufferAddr(LCDIF, (uint32_t)color_p);
#endif /* DEMO_USE_ROTATE */
    s_framePending = true;

#if defined(SDK_OS_FREE_RTOS)
    if (xSemaphoreTake(s_frameSema, portMAX_DELAY) == pdTRUE)
    {
        /* IMPORTANT!!!
         * Inform the graphics library that you are ready with the flushing*/
        lv_disp_flush_ready(disp_drv);
    }
    else
    {
        PRINTF("Display flush failed\r\n");
        assert(0);
    }
#else
    while (s_framePending)
    {
    }
#endif

}
Multi-language application#
This tutorial walks through a complete multi-language workflow using the LVGL lv_i18n module, built around the same pattern used by the Air Conditioner application template shipped with GUI Guider. The example supports six languages — English, Chinese, Korean, Japanese, German, and Arabic — and switches them at runtime through a dropdown.
The approach combines four pieces:
YAML translation files per language.
An
lv_i18nlanguage pack generated from the YAML files.A small language manager that wraps
lv_i18nand exposes anlv_subject_tfor UI binding.An observer callback in
custom.cthat re-renders all translated widgets (and switches fonts) when the language changes.
The following sections describe the full setup in the order it should be performed.
2. Extracting source strings and compiling the language pack#
The LVGL lv_i18n CLI scans the generated C code for _("…") calls and updates the YAML files with any new source strings. It then compiles the YAML files into the lv_i18n.c / lv_i18n.h language pack.
In custom/translations/, use these two helper scripts:
extract.sh:
lv_i18n extract -s '../../generated/**/*.c' -t './*.yml'
compile.sh:
lv_i18n compile -t "./*.yml" -o .
Run extract.sh after adding new _("…") calls in the generated code, then run compile.sh to regenerate custom/lv_i18n.c and custom/lv_i18n.h. The compiled language pack exposes a lv_i18n_language_pack symbol that is consumed by lv_i18n_init().
3. Implementing the language manager#
Wrap lv_i18n in a small manager that exposes a language enum and an lv_subject_t. The subject lets any widget observe language changes without polling.
custom/language_manager.h:
#include "lvgl.h"
#include "lv_i18n.h"

typedef enum {
    LANG_EN = 0,
    LANG_ZH,
    LANG_KO,
    LANG_JA,
    LANG_DE,
    LANG_AR,
    LANG_MAX
} language_t;

typedef struct {
    lv_subject_t subject;
    language_t   current_lang;
} language_manager_t;

extern language_manager_t g_lang_manager;

void           language_manager_init(void);
void           language_manager_set_language(language_t lang);
language_t     language_manager_get_language(void);
lv_subject_t * language_manager_get_subject(void);
custom/language_manager.c:
language_manager_t g_lang_manager;

void language_manager_init(void)
{
    lv_subject_init_int(&g_lang_manager.subject, LANG_EN);
    g_lang_manager.current_lang = LANG_EN;

    lv_i18n_init(lv_i18n_language_pack);
    lv_i18n_set_locale("en");
}

void language_manager_set_language(language_t lang)
{
    if (lang >= LANG_MAX) return;

    g_lang_manager.current_lang = lang;

    switch (lang) {
        case LANG_EN: lv_i18n_set_locale("en"); break;
        case LANG_ZH: lv_i18n_set_locale("zh"); break;
        case LANG_KO: lv_i18n_set_locale("ko"); break;
        case LANG_JA: lv_i18n_set_locale("ja"); break;
        case LANG_DE: lv_i18n_set_locale("de"); break;
        case LANG_AR: lv_i18n_set_locale("ar"); break;
        default: break;
    }

    lv_subject_set_int(&g_lang_manager.subject, lang);
}
language_manager_init() initializes the language pack and the default locale. language_manager_set_language() switches the locale and publishes the change through the subject.
4. Translating widget text and applying per-language fonts#
In custom.c, implement an update_ui_texts() function that:
Picks an appropriate font for the active language (CJK and Arabic require dedicated fonts).
Re-applies the text of every translated widget using the
_("…")macro provided bylv_i18n.Re-applies the font style on each widget.
void update_ui_texts(gg_ui_t * ui, language_t lang)
{
    const lv_font_t * common_font     = NULL;
    const lv_font_t * title_font      = NULL;
    const lv_font_t * main_title_font = NULL;

    switch (lang) {
        case LANG_EN:
            common_font     = &lv_font_LiberationSans_11;
            title_font      = &lv_font_LiberationSans_13;
            main_title_font = &lv_font_LiberationSans_22;
            break;
        case LANG_ZH:
        case LANG_KO:
            common_font     = &lv_font_SourceHanSerifSC_10;
            title_font      = &lv_font_SourceHanSerifSC_11;
            main_title_font = &lv_font_SourceHanSerifSC_16;
            break;
        case LANG_AR:
            common_font     = &lv_font_NotoSansArabic_Regular_8;
            title_font      = &lv_font_NotoSansArabic_Regular_11;
            main_title_font = &lv_font_NotoSansArabic_Regular_16;
            break;
        /* ja, de … */
        default: break;
    }

    lv_label_set_text(ui->scrAircon.contAirconCtrl_labelSetTemp, _("SET TEMPERATURE"));
    lv_obj_set_style_text_font(ui->scrAircon.contAirconCtrl_labelSetTemp,
                               title_font, LV_PART_MAIN | LV_STATE_DEFAULT);

    lv_label_set_text(ui->scrAircon.imageTitleBG_labelAirconTitle, _("Air Conditioner"));
    lv_obj_set_style_text_font(ui->scrAircon.imageTitleBG_labelAirconTitle,
                               main_title_font, LV_PART_MAIN | LV_STATE_DEFAULT);

    lv_roller_set_options(ui->scrAircon.contAirconCtrl_rollerMode,
                          _("COOL\nDRY\nFAN"), LV_ROLLER_MODE_INFINITE);

    /* Repeat for every translatable widget. */
}
Every translatable source string must be wrapped in _("…") so that lv_i18n extract can pick it up.
5. Observing language changes and refreshing the UI#
Add an observer callback that re-renders the UI whenever the language subject changes. The same callback also keeps the language dropdown in sync.
void language_observer_callback(lv_observer_t * observer, lv_subject_t * subject)
{
    gg_ui_t  * ui   = (gg_ui_t *)lv_observer_get_user_data(observer);
    language_t lang = (language_t)lv_subject_get_int(subject);

    update_ui_texts(ui, lang);
    lv_dropdown_set_selected(ui->layer_top.AirconLanguageDDlist, lang);
}
6. Wiring up the language manager in GUI Guider#
In GUI Guider, attach the following code to the setup event of the main screen (in the screen’s custom-C panel). It initializes the language manager, registers the observer, and renders the UI in the default language.
// Initialize the language management system
language_manager_init();

lv_subject_add_observer(language_manager_get_subject(),
                        language_observer_callback, ui);

update_ui_texts(ui, 0);
Then add a dropdown widget for language selection and attach the following code to its value changed event:
uint32_t id = lv_dropdown_get_selected(ui->layer_top.AirconLanguageDDlist);
language_manager_set_language((language_t)id);
The dropdown entry order must match the language_t enum.
7. Verifying the build and iterating on translations#
Generate code and build the simulator or target.
Switch languages from the dropdown — every widget wrapped in
_("…")should update instantly, and the corresponding font should apply.When new translatable strings are added, repeat the extraction and compilation step (
extract.sh→compile.sh) to refresh the language pack.
Notes on resources and layout#
Fonts: CJK and Arabic require dedicated font files imported into the project. Choose font sizes per language to keep visual balance, as shown in
update_ui_texts().Layout: Translated strings vary in length. Use flexible containers or right-align critical labels so that longer translations (often German) do not overflow.
Right-to-left languages: For Arabic, ensure the relevant LVGL configuration (
LV_USE_BIDI) is enabled and the chosen font supports the required glyph shaping.
For full details on the underlying lv_i18n API, refer to the lv_i18n GitHub repository.
Migration from GUI Guider v1#
GUI Guider v2.0 introduces a redesigned architecture and a new project structure that are not backward-compatible with GUI Guider v1. As a result, v1 projects cannot be opened or automatically upgraded in v2.0.
The recommended path is to recreate the project in GUI Guider v2.0 rather than attempting a file-level conversion. This lets you take full advantage of the new workflow, widget model, and code generation pipeline. You can still reuse existing assets — such as images and fonts — by importing them into the new project through the Resource Manager.
Why projects cannot be upgraded in place#
The v2.0 project format, widget definitions, and generated-code structure differ fundamentally from v1. There is no reliable one-to-one mapping between the two formats, so an automated converter would risk producing broken layouts or invalid generated code. Recreating the UI in v2.0 ensures a clean, maintainable result.
What you can reuse#
Asset |
Reusable |
How |
|---|---|---|
Images |
Yes |
Import into the v2.0 project via the Resource Manager. |
Fonts |
Yes |
Import into the v2.0 project via the Resource Manager. |
Custom C code |
Partially |
Copy reusable logic into the new project’s |
Screen layouts and widgets |
No |
Recreate them in the v2.0 visual editor. |
Generated UI code |
No |
Regenerate it in v2.0; do not copy v1 generated files. |
Recommended migration workflow#
Inventory the v1 project. Note the screens, key widgets, custom logic, and the image and font assets you want to carry forward.
Create a new v2.0 project. Set up the project with the target board, resolution, and LVGL version that match your application.
Import shared assets. Use the Resource Manager to bring over images and fonts from the v1 project.
Rebuild the UI. Recreate each screen and its widgets in the v2.0 visual editor, applying the new widget model and styling.
Reattach custom logic. Move reusable hand-written code into the
customdirectory and connect it through screen or event custom code (see Custom code integration).Generate, simulate, and verify. Generate code, run the simulator, and confirm that behavior matches the original v1 application before deploying to target.
Tip: Migrate one screen at a time and verify it in the simulator before moving on. Incremental migration makes it far easier to isolate and fix any layout or behavior differences.