Advanced Features#
This section provides the description of advanced features.
Switching the processor#
You can switch the processor or the package of the current configuration to a different one. However, switching to a completely different processor may lead to various issues, such as inaccessible pin routing or unsatisfiable clock-output frequency. In that case, it’s necessary to fix the problem manually. For example, go to the Routing Details view and reconfigure all pins which report an error or conflict. Alternatively, you may need to change the required frequencies on clock output.
To change the processor in the selected configuration, select File > Switch processor from the Menu bar.
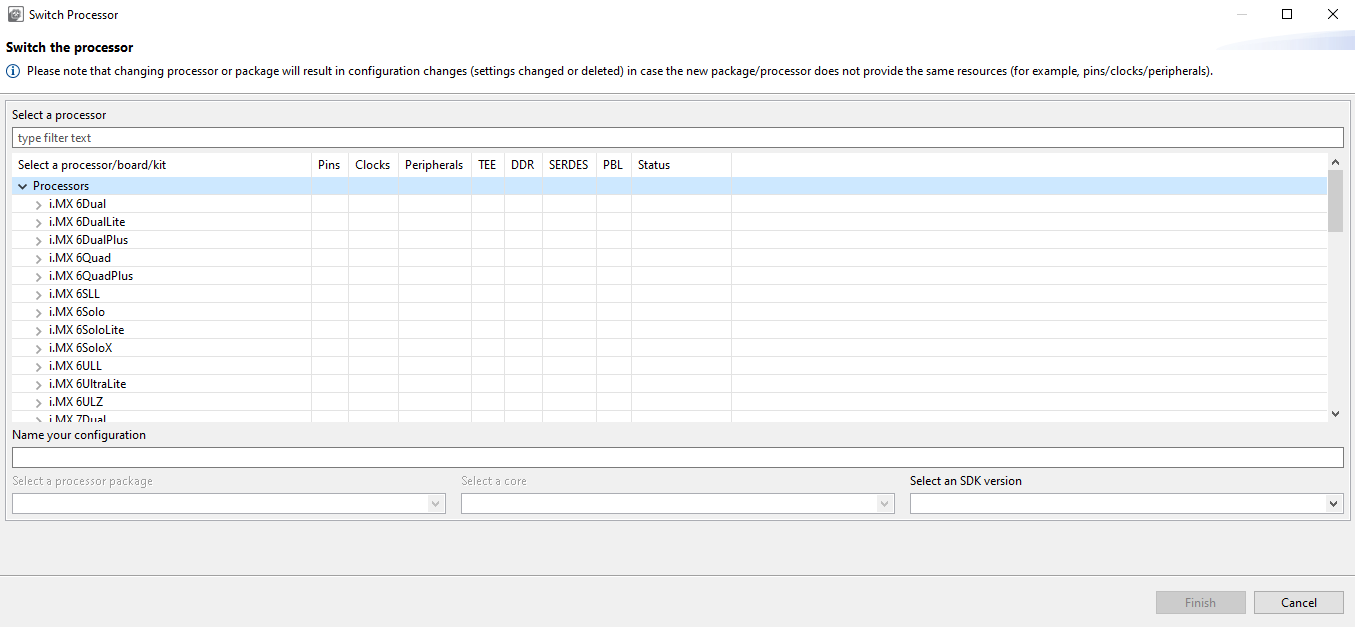
Switch processor#
To change the package of the currently selected processor, select File > Switch package from the Menu bar.
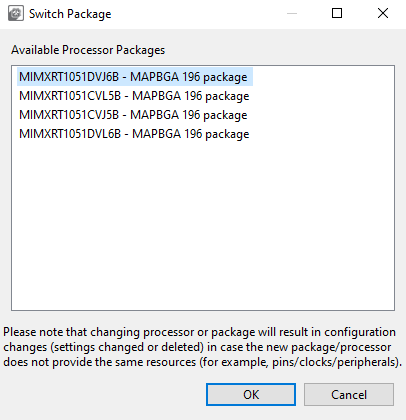
Switch package#
Exporting the Pins table#
To export the Pins table, do the following:
In the Menu bar, select File > Export.
In the Export wizard, select Export the Pins in CSV (Comma Separated Values) Format.
Click Next.
Select the folder and specify the filename to which you want to export.
The exported file contains content of the Pins view table, and lists the functions and the selected routed pins.
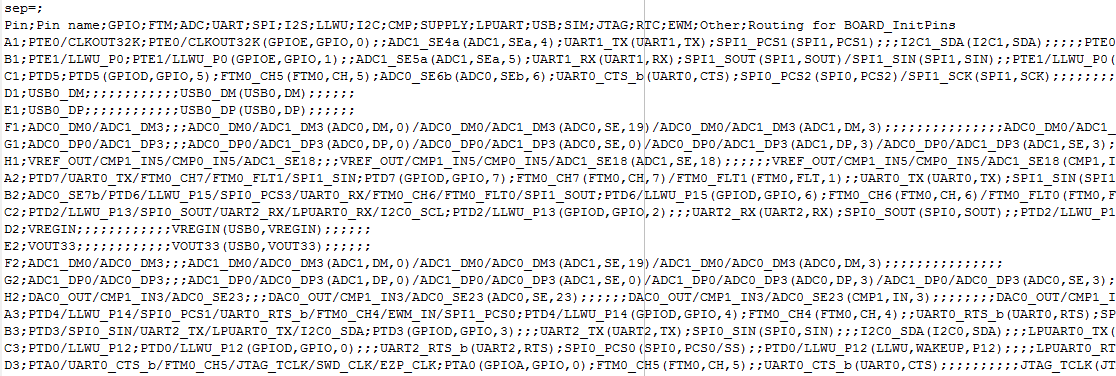
Exported file content#
The exported content can be used in other tools for further processing. For example, see it after aligning to blocks in the image below.
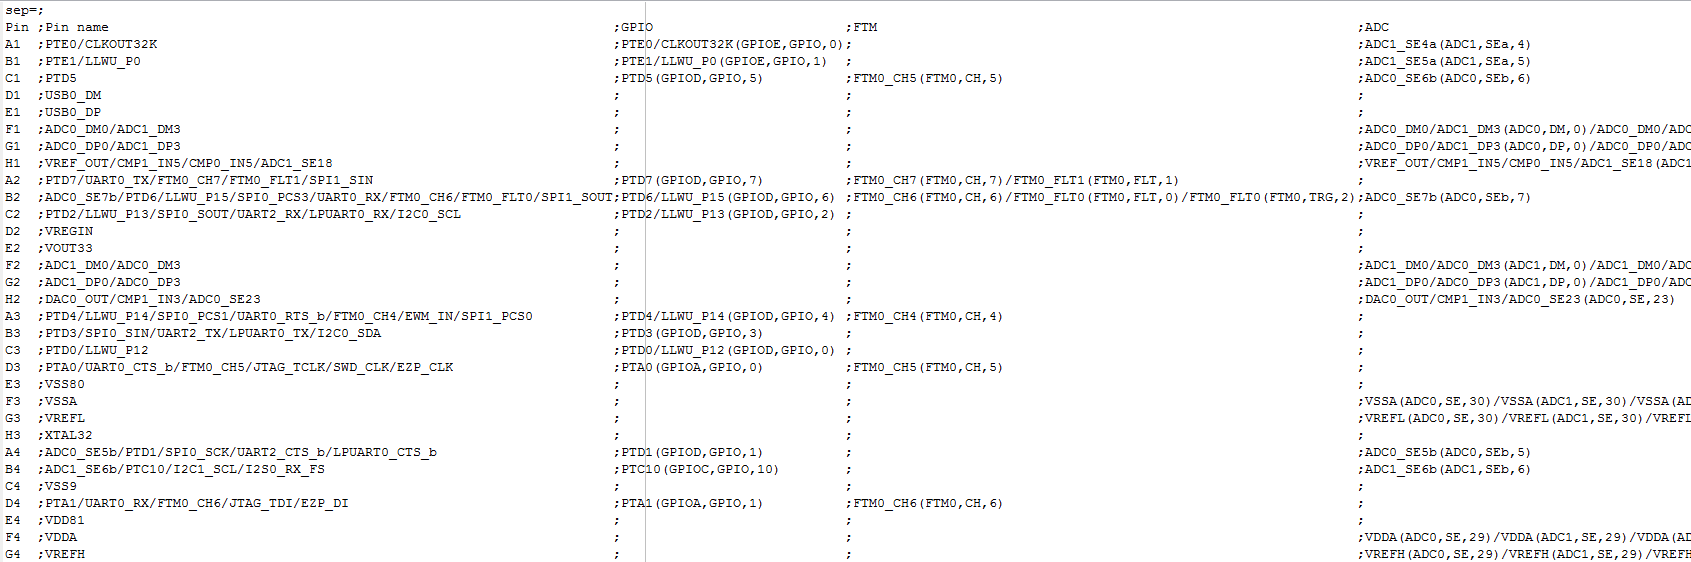
Aligning to block#
Tools advanced configuration#
Use the tools.ini file to configure the processor data directory location. You can define the “com.nxp.mcudata.dir” property to set the data directory location.
For example: -Dcom.nxp.mcudata.dir=C:/my/data/directory.
Generating HTML reports#
You can generate an HTML report file displaying your configuration of Pins, Clocks, and Peripheral tool for future reference.
To generate the HTML report, select Export > Pins > Export HTML Report.
Exporting sources#
It’s possible to export the generated source using the Export wizard.
To launch the Export wizard:
Select File > Export from the Menu bar.
Select Export Source Files.
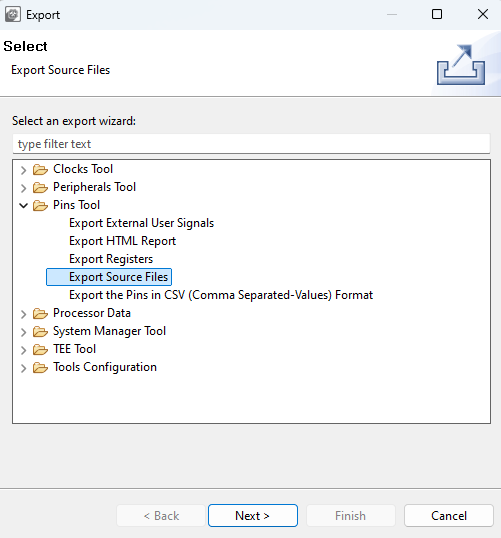
Export wizard#
Click Next.
Select the target folder where you want to store the generated files.
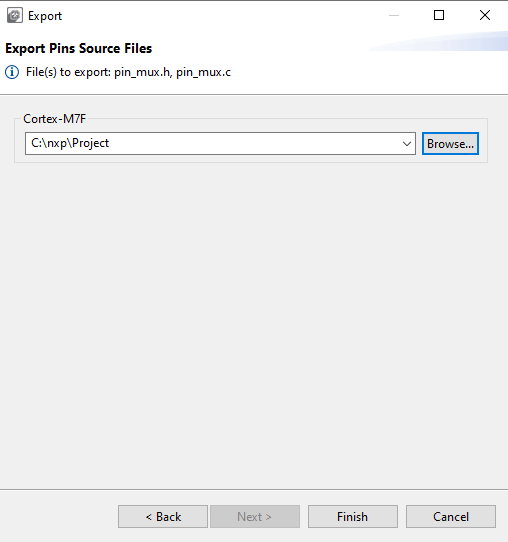
Export sources – Select target folder#
In case of multicore processors, select the cores you want to export.
Click Finish.
Exporting registers#
You can export the content of tool-modified registers data using the Export wizard.
To export registers, follow these steps:
Select File > Export from the main menu.
Select the Pins Tool > Export Registers option.
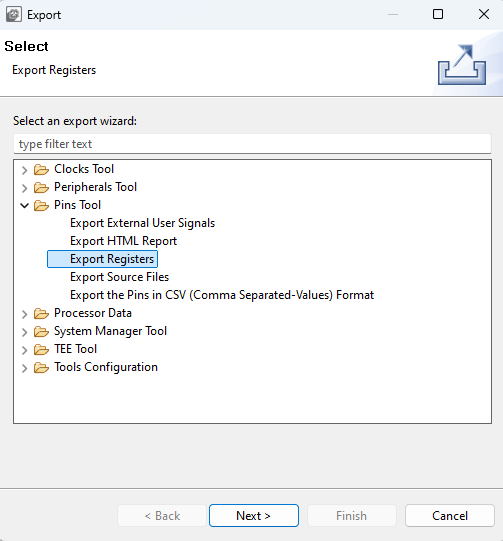
Export registers#
Click Next.
Select the target file path where you want to export modified registers content.
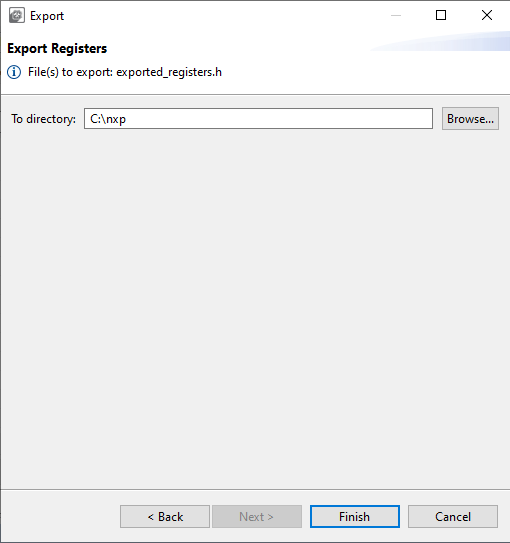
Export registers directory#
Click Finish.
Note: Export wizard can also be opened by clicking the Export registers to CSV button in the Registers view.
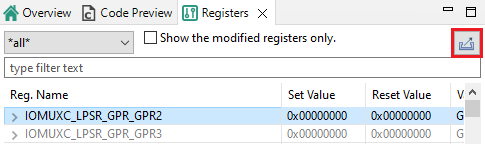
Export registers to CSV#
Managing data and working offline#
With the Data Manager, you can download, import, and export processor data. This feature is especially useful if you want to make the best out of the tools while staying offline.
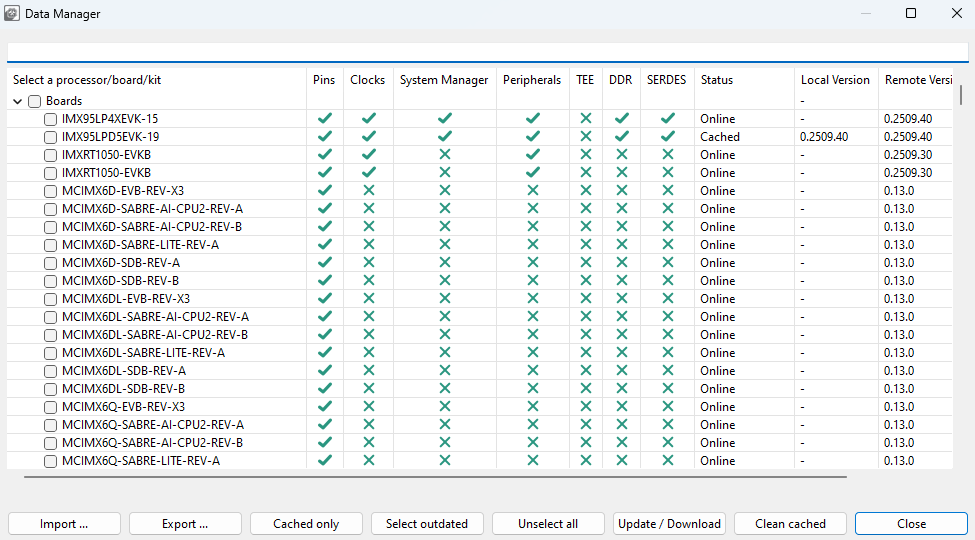
Data Manager#
Working offline#
You can create a new configuration even without access to the Internet by working with cached processor data. To do so you must download processor-specific data before going offline, or import data downloaded and exported from an online computer.
To work offline, select Edit > Preferences > Work offline from the Menu bar.
Downloading data#
You can download required processor data with Data Manager.
Note: By default, the data is downloaded and cached automatically during the Creating a new standalone configuration for processor, board, or kit process.
To download processor data, do the following:
Note: Internet connection is required for data download.
In Menu bar, select File > Data Manager.
In Data Manager, select the processor/board/kit you want to work with from the list.
Click Update / Download and confirm.
The data is now downloaded on your local computer, as shown by the Cached status in Data Manager.
You can now close your Internet connection and work with the data by selecting File > New… > Create new standalone configuration for processor, board, or kit in the Start development wizard.
Exporting data#
With Data Manager, you can export downloaded processor data in a ZIP format.
To export data, do the following:
In Menu bar, select File > Data Manager.
In Data Manager, click Export.
In Export Processor Data window, select the processor data you want to export.
Click Browse to specify the location and name of the resulting ZIP file.
Click Finish,
Data is now saved on your local computer in a ZIP format. You can physically (for example, with a USB stick) move it to an offline computer.
Note: You can also export downloaded data by selecting File > Export > Processor Data > Export Processor Data from the Menu bar.
Importing data#
You can import processor data from another computer with Data Manager, provided this data is available locally.
To import data, do the following:
In Menu bar, select File > Data Manager.
In Data Manager, select Import.
In Import Processor Data dialog, click Browse.
Specify the location of the ZIP file that you want to import and click OK.
Choose the data to import by selecting the checkbox in the table.
Click Finish.
The data is now imported to your offline computer, as shown by the Cached status in Data Manager. You can now work with the data by selecting New… > Create new standalone configuration for processor, board, or kit in the Start development wizard.
Note: You can also import data by selecting File > Import > Import Processor Data from the Menu bar.
Updating data#
You can keep cached data up to date with the Data Manager.
Note: If you select the relevant option in Edit > Preferences in the Menu bar, data will be updated automatically or after a prompt.
Note: Internet connection is required for data update.
To update cached data, do the following:
In Menu bar, select File > Data Manager.
In Data Manager, filter outdated data by clicking Select outdated.
Click Update / Download and confirm.
You can always check versions of your data by clicking Cached only and comparing version information in the Local Version and Remote Version columns.
You can clean all cached data by selecting Clean cached. It removes all processor, board, kit, and component data, as well as SDK info files from your computer.
Note: This action does not affect user templates.
Output path overrides#
This section contains rules that override the path, including the name, of the output files generated by the tools. The rules are applied in the Update Code, Export Wizard, and Command-Line Export commands. The rules are stored in the MEX configuration.
Note: An invalid path is logged as a warning and the original non-overridden path is used.
Rules can be edited in the Output Path Override dialog box in the configuration settings. The new rule is added to the end of the list, the removal is performed for the selected element. The rules are applied to the path in a defined order, which can be changed. The rule contains:
Enabled – defines whether the rule will be used by the applied path or skipped.
Description – used as a user-friendly description of the rule
Regular expression – matches the overriding parts in the whole output path. The format is taken from the Java regular expression.
Replacement expression – used as a replacement of all matches in the path. Substring groups can be referenced by using placeholder $1, $2 and so on.
The output path override rules can be exported using the wizard to a yaml file. The structure of the yaml file is similar to that of the dialog box.
Example content of the output path override yaml file:
outputPathOverrides:
-description: Rule group.h
enabled:true
regex:(bo)ar(d)(/.*\.h)
replacement: $2ar$1$3
-description:Rule2
...
The second way to set the rules is to replace them by overriding the output path from the yaml file using wizards or the command line. Rules are used only if all rules are valid. An empty list deletes the current rules. An empty list in the output path overrides the yaml file.
outputPathOverrides: [
]
Import pins configuration from legacy tools project#
The Pins tool from Config Tools for i.MX helps in importing pins configuration from the existing legacy tools projects with the following prerequisites.
Before importing any pins configuration from the legacy tools project, download the required i.MX processor pins tool data to a local directory.
Before importing, create a new configuration for the respective i.MX processor of the given package variant, to minimize the need of manual correction of the imported pins configuration.
Importing from an IO Mux Tool design configuration file#
You can import an existing pin configuration from an IO Mux Tool Design Configuration project file (XML) that was used to keep pin routing configuration within a legacy IO Mux Tool. The import wizard is used to import pin routing configuration from existing project XML file compatible with IO Mux Tool version v3.4.0.3.
To import from an IO Mux Tool design configuration file, do the following:
Select File > Import from the Main Menu.
Select the Import Legacy IOMux Tool Design Configuration (XML) Format option.
Click Next.
Select the source file (XML) to import by using the Browse button in the Import dialog.
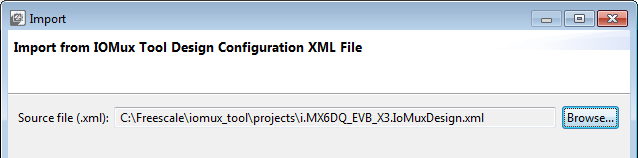
Import from IOMux Tool Design Configuration XML File#
Click Finish.
The selected source file is processed and the existing pin configuration for peripheral routing is imported for each peripheral to the Pins tool. A new function is created for each peripheral instance with all configured pins using the function name “configure_<peripheral name>_pins” and added into the Routed Pins view.
Importing from a Processor Expert project#
You can import the existing pin configuration from a Processor Expert (PEx) project file (PE). The PE file is the main project file for legacy i.MX pin mux component and is available within the Processor Expert for i.MX tool.
The Import wizard is used to import legacy i.MX pin configuration from the existing PEx project file.
To import from a Processor Expert project, do the following:
Select File > Import from the main menu.
Select the Import Legacy i.MX Pins Configuration (PEx for i.MX) Format option.
Click Next.
Select the source file (.pe) to import using the Browse button in the Import Pins Configuration from Processor Expert Project dialog.
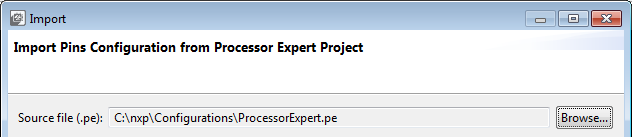
Import Pins Configuration from Processor Expert Project#
Click Finish.
The selected source file is processed and the existing pin configuration for peripheral routing is imported for each peripheral to the Pins Tool. A new function is created for each peripheral instance with all configured pins using the function name “
configure_<peripheral name>_pins” and is added into the routed pins.
Command-line execution#
This section describes the Command Line Interface (CLI) commands supported by the desktop application.
On error application exits:
Tools v4.1 and older:
With ‘123321’ error code. The reason should be logged.
Tools v5.0 and newer:
when a parameter is missing
when a tool error occurs
You can chain commands in CLI.
Notes regarding command-line execution:
Command -HeadlessTool is used as a separator of each command chain.
Each command chain works independently.
Every chain starts with the -HeadlessTool command and continues to the next -HeadlessTool command, or end. (The only exception are commands from the framework that do not need the -HeadlessTool command).
Commands that do not need the -HeadlessTool command, can be placed before the first -HeadlessTool if chained, or without -HeadlessTool when not chained.
Commands from each tool are executed in a given order.
Commands from the framework are not executed in a given order.
The following commands are not executed in a given order:
ImportProject
Export MEX
ExportAll
The application can exit with the following codes when unexpected behavior occurs:
When a parameter is missing: 1
When a tool error occurs: 2
Command example:
For performance reasons, when CLI is expected to be used multiple times with the same processor, the data is only loaded if it is not already on disk. If there is newer data on the server, it is not updated.
Long-running jobs share data, so they do not get updated in the middle of execution. To update local data that may have a newer version on the server, use the -updateData parameter.
Recommended usage:
For manual one-time usage, include the
-updateDataparameter on the CLI.For multiple executions, for example, continuous integration set-up your job:
Use the first simple command with
-updateData, which updates possibly outdated data.Use all other commands in a batch run without this parameter:
copy /Y eclipsec.exe toolsc.exe@rem updates all local data if newer existstools.exe -updateData -consoleLog -HeadlessTool Pins@rem now runs tools many timestools.exe -consoleLog -HeadlessTool Pins -Load some.mex -ExportAll c:/directorytools.exe -consoleLog -HeadlessTool Pins -Load other.mex -ExportAll c:/other_directory@rem and so on.
The following commands are supported in the framework:
Command name |
Definition and parameters |
Description |
Restriction |
Example |
|---|---|---|---|---|
Version of the product |
|
Shows the build version of the product into the stdout and continues with parsing other parameters. (since 6.0) |
-version |
|
Force language |
|
Forces set language. {lang} is in ISO-639-1 standard |
Removal of the ‘. |
-nl zh |
Show console |
|
Logs output is also sent to Java’s System.out (typically back to the command shell if any) |
None |
|
Empty configuration |
|
Ensures creating a new empty configuration without any content |
Requires the |
-HeadlessTool Pins -EmptyConfig |
Select MCU |
|
MCU to be selected by frameworkChanges the processor in the result configuration of the previous chain |
Requires the |
-HeadlessTool Pins -MCU MK64FX512xxx12 -SDKversion ksdk2_0-HeadlessTool Pins -Load C:/conf/conf.mex -SDKVersion ksdk2_0 -MCU MK64FN1M0xxx12 -ExportMEX C:/conf/MK64.mex |
Select core |
|
Select core for the configuration |
Requires the |
-HeadlessTool Pins -Core core0 |
Select board |
|
Board to be selected by framework (MCU is automatically selected too)(since 6.0) |
Requires the |
-HeadlessTool Pins -Board FRDM-K22F -SDKversion ksdk2_0 |
Select kit |
|
Kit to be selected by framework (MCU and board is automatically selected too)(since 6.0) |
Requires the |
-HeadlessTool Pins -Kit FRDM-K22F-AGM01 -SDKversion ksdk2_0 |
Select SDK version |
|
Version of the MCU to be selected by framework |
Requires the |
-HeadlessTool Pins -MCU MK64FX512xxx12 -SDKversion ksdk2_0 |
Select part number |
|
Selects a specific package of the MCUChanges the package in result configuration of the previous chain, see the command about |
Requires the |
-HeadlessTool Pins -MCU MK64FX512xxx12 -SDKversion ksdk2_0 -PartNum MK64FX512VLL12 |
Configuration name |
|
Name of newly created configuration - used in exportRename the configuration |
Requires the |
-HeadlessTool Pins -MCU MK64FX512xxx12 -SDKversion ksdk2_0 -ConfigName “MyConfig”-HeadlessTool Pins -ConfigName “MyRenameConfig” |
Select tool |
|
Selects a tool that must be run in headless mode |
If the tool is disabled in the configuration, it will not be enabled by this option. Use |
-HeadlessTool |
Load configuration |
|
Loads the existing configuration from a |
None |
-Load C:/conf/conf.mex |
Export Mex |
|
Exports the. |
Requires the |
-HeadlessTool Pins -MCU xxx -SDKversion xxx -ExportMEX C:/exports/my_config_folder-HeadlessTool Pins -ExportMEX C:/exports/my_config_folder/my.mex |
Export all generated files |
|
Exports all generated files (with source code, and so on). Code is regenerated before exportIncludes |
Requires the |
-HeadlessTool Pins -ExportAll C:/exports/generated |
Create a new configuration by importing a toolchain project |
|
Creates a new configuration by importing the toolchain project. The parameter is a path to the root of the toolchain project. |
Requires the |
-HeadlessTool PrjCloner -ImportProject c:\test\myproject-HeadlessTool Peripherals -ImportProject c:\test\myproject-HeadlessTool PrjCloner -ImportProject c:\test\myproject\myproject.cbuild-gen-idx.yml-HeadlessTool Peripherals -ImportProject c:\test\myproject -sdkPath c:\test\sdk_dir |
Create a new configuration from a toolchain project |
|
Creates a new configuration (memory only) by importing a toolchain project based on the found |
None |
-HeadlessTool PrjCloner -CreateFromProjectc:\test\myproject-HeadlessTool Peripherals -CreateFromProject c:\test\myproject-CreateFromProject c:\test\myproject\myproject.cbuild-gen-idx.yml |
Generate source files with custom copyright |
|
The file content is inserted as a copyright file header comment into generated source files (.c, .h, .dts, .dtsi), that does not contain copyright |
Requires the |
-HeadlessTool Pins -CustomCopyright c:\test\copyright.txt |
Override the output path of the generated files |
|
Path to the file with rules that will be used to override output paths of the generated file. An empty list of rules removes the set rules. |
Requires the |
-HeadlessTool Pins -OutputPathOverrides c:\test\outputPathOverrideRules.yaml |
Batch processing |
|
Path to the file with commands that will be run on defined paths. For details, see: Batch processing |
Requires the |
-HeadlessTool Pins -BatchFile C:/conf/batchCommands.yaml |
Project link |
|
A custom path to the toolchain project folder. It can be used as the absolute path or relative against the saved configuration. Empty sting for default that is not saved in the configuration (since v14). |
When the command is not used along with the |
-HeadlessTool Pins -ProjectLink C:/project-HeadlessTool Pins -ProjectLink armgcc-HeadlessTool Pins -ProjectLink “”-Load C:/conf/conf.mex -ProjectLink armgcc |
Update locally downloaded data |
|
Downloads data for already locally downloaded data if they have an update. |
None |
-updateData |
Update code generated by tools, that is .c and .h (and other) source files. |
|
Performs the update code operation for all tools, the same way as is the default behavior of the Update Code button and then clicking OK. If the configuration was modified in UI tools to generate only some sources, only these sources are generated. Select a saved configuration, for example via the |
Requires the |
-HeadlessTool Clocks -UpdateCode -Load C:/conf/conf.mex -Load C:/conf/conf.mex -HeadlessTool Clocks -UpdateCode Note: “-Load” can be both before or after “-HeadlessTool” argument, “-UpdateCode” must be after “-HeadlessTool” |
Command-Line execution - Pins Tool#
This section describes the Command Line Interface (CLI) commands supported in the Pins Tool.
Command name |
Definition and parameters |
Description |
Restriction |
Example |
|---|---|---|---|---|
Enable tool |
|
Enables the tool if it is disabled in the current configuration |
Requires the |
Requires -HeadlessTool Pins -Enable |
Import C files |
|
Imports .c files into configuration. Importing is done after loading mex and before generating outputs |
Requires the |
-HeadlessTool Pins -ImportC C:/imports/file1.c C:/imports/file2.c |
Export all generated files (to simplify all exports commands to one command) |
|
Exports generated files (with the source code, and so on). The code is regenerated before the export. Includes -ExportSrc,-ExportCSV, -ExportHTML and in framework -ExportMEX. The argument is expected to be a folder |
Requires the |
-HeadlessTool Pins -ExportAll C:/exports/generated |
Export Source files |
|
Exports generated source files. The code is regenerated before the export. The argument is expected to be a folder. |
Requires the |
-HeadlessTool Pins -ExportSrc C:/exports/src |
Export CSV file |
|
Exports the generated . |
Requires the |
-HeadlessTool Pins -ExportCSV C:/exports/csv |
Export HTML report file |
|
Exports the generated HTML report file. The code is regenerated before the export. The argument is expected to be a folder. |
Requires the |
-HeadlessTool Pins -ExportHTML C:/exports/html |
Export registers |
|
Exports the registers tab into a folder. The code is regenerated before the export. The argument is expected to be a folder. |
Requires the |
-HeadlessTool Pins -ExportRegisters C:/exports/regs |
Command-line execution - Peripherals Tool#
This section describes the Command-Line Interface (CLI) commands supported by the Peripherals Tool.
Command name |
Definition and parameters |
Description |
Restriction |
Example |
|---|---|---|---|---|
Enable tool |
|
Enables the tool if it is disabled in the current configuration. |
Requires the |
-HeadlessTool Peripherals -Enable |
Import C files |
|
Imports |
Requires the -HeadlessTool Peripherals command |
-HeadlessTool Peripherals -ImportC C:/imports/file1.c C:/imports/file2.c |
Export all generated files (to simplify all exports commands to one command) |
|
Exports generated files (with source code and so on). The code is regenerated before the export. Includes -ExportSrc, -ExportHTML, and in the framework -ExportMEX. The argument is expected to be a folder. |
Requires the |
-HeadlessTool Peripherals -ExportAll C:/exports/generated |
Export Source files |
|
Exports generated source files. The code is regenerated before the export. The argument is expected to be a folder. |
Requires the |
-HeadlessTool Peripherals -ExportSrc C:/exports/src |
Export the HTML report file |
|
Exports the generated HTML report file. The code is regenerated before the export. The argument is expected to be a folder. |
Requires the |
-HeadlessTool Peripherals -ExportHTML C:/exports/html |
Migrate all Peripherals tool components to the versions used in the toolchain project |
|
Migrates all instances of Peripherals tool components, which are not configuring the version used in the toolchain project, to the version of SDK component used in the toolchain project. No changes are done when the toolchain is not linked or the Peripherals tool component already configures the version of the SDK component used in the toolchain project. |
Requires the -HeadlessTool Peripherals command |
-HeadlessTool Peripherals -MigrateComponentsToToolchainVersion -ExportAll C:/exports/toolchainVersions |
Migrate all Peripherals tool components to the highest supported version of the SDK component |
|
Migrates all instances of Peripherals tool components to the MCU’s highest supported version of the SDK component, which the Peripherals tool component configures. No changes are done when already using the highest version available on the MCU. |
Requires the -HeadlessTool Peripherals command |
-HeadlessTool Peripherals -MigrateComponentsToLatestVersion -ExportAll C:/exports/toolchainVersions |
Regenerate all PLU configurations |
|
Regenerates the content of all PLU instances present in the configuration. Currently only the PLU instances in Verilog file and Verilog text modes are regenerated by new Verilog code synthesis and optimization of the model. Requires usage of mapping comment in the Verilog code. |
Requires the |
-Load C:/xyz.mex -HeadlessTool Peripherals -PLURegenerateConfigurations - ExportAll C:/exports/plu |
Command-Line execution - TEE Tool#
This section describes the Command Line Interface (CLI) commands supported in the TEE Tool.
Command name |
Definition and parameters |
Description |
Restriction |
Example |
|---|---|---|---|---|
Enable tool |
|
Enables the tool if it is disabled in the current configuration |
Requires the |
-HeadlessTool TEE -Enable |
Export all generated files (to simplify all exports commands to one command) |
|
Exports generated files (with source code and so on). The code is regenerated before the export. Includes -ExportSrc, -ExportHTML, and in framework -ExportMEX. The argument is expected to be a folder. |
Requires the |
-HeadlessTool TEE -ExportAll C:/exports/generated |
Export Source files |
|
Exports generated source files. The code is regenerated before the export. The argument is expected to be a folder. |
Requires the |
-HeadlessTool TEE -ExportSrc C:/exports/src |
Export registers |
|
Exports the registers tab into a folder. The code is regenerated before the export.The argument is expected to be a folder. |
Requires the |
-HeadlessTool TEE -Enable -ExportRegisters C:/exports/regs |
Batch processing#
Batch processing can be used to simplify and speed up processing of multiple configurations in an automated way using the command-line interface.
Batch processing is initiated by the headless command “-BatchFile”. When the command is used, the tool operation is controlled by the specified batch file passed as an argument.
Example:
-HeadlessTool Pins -BatchFile C:/conf/batchCommands.yaml
Note: It is intended to be used without specifying other tools commands except “-HeadlessTool”.
Content of the batch file#
The batch file content is in YAML format and consists of the folders or files list and the list of command steps. All the steps are executed for each individual path in the given order. If the ‘folders’ entity is used, the ‘files’ cannot be used and vice versa.
Note: Paths can be defined as absolute or relative to the batch file.
Folders list#
The entity “folders” contains a list of the folders to be processed.
Example of the folders list:
!!batch_process
folders:
- c:/ test/frdm64
- c:/_ddm/tmp/test/lpc69
steps:
- action: ImportC
  tool: Pins
  args: ${folder}/src/board/pin_mux.c
- action: ImportC
      tool: Clocks
      args: ${folder}/src/board/clock_config.c
- action: ExportAll
      tool: Clocks
      args: ${folder}/export/clocks
Note: The steps element description is given below.
Files list#
The entity “files” specifies the list of the files to be processed.
Example of the list of files:
!!batch_process
files:
- c:/_ddm/tmp/test/frdm64/src/board/pin_mux.c
- c:/_ddm/tmp/test/lpc69/src/board/pin_mux.c
steps:
- action: ImportC
  args: ${file}
  tool: Pins
- action: ImportC
  tool: Clocks
  args: ${folder}/clock_config.c
Steps list#
The steps entity contains a list of steps to be processed for every listed path in a similar way as standard headless command-line tool commands.
Each step is defined as a structure:
Action – the name of a command-line tool command without “
-” at the beginning.Tool – the name of the tool in the product that runs the action.
Args – arguments of the actions, a space between the parameters is expected.
The following variables can be used and will be substituted with the appropriate value. In case the “files” list is processed:
${folder}– replaced by folder (without separator at the end) where the file is located${file}– the full file path${fileName}- for filename without path
In case the “folders” list is processed:
${folder}– the folder path without separator at the end
See the section Command-line execution for the list of commands and their description.
The configuration is always automatically cleaned after processing each path (as if the -EmptyConfig command was used). The batch file without any paths runs once and cannot use any variables.
Note: All paths on loading are converted to the path format with “/” as a separator.