Flash
Quick access links to program the flash or to fully erase the flash are available on the project context menu.
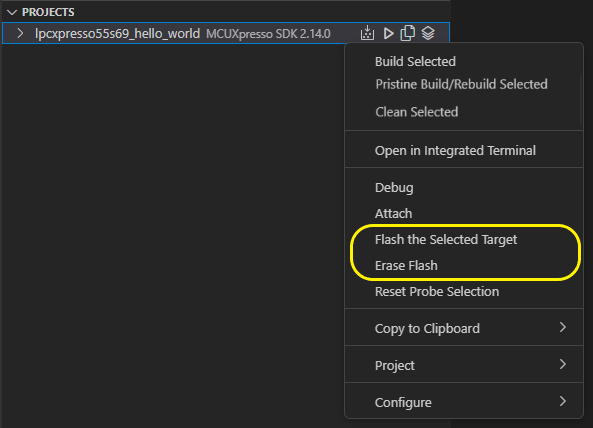
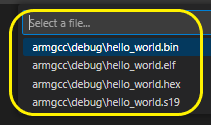
In case of flash operation, a dialog will ask to confirm (or to select in case of multiple binary files are found) the image file you want to program.
In addition, there is a customized (by debug probe type) view providing an extended set of options for flashing, erasing and various other actions depending on the probe type.

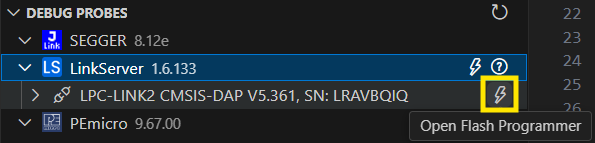
For quick access to the probe-specific Flash Programmer tool, the Debug Probes view can also be used. Make sure to select the desired detected probe, or the generic probe type in order to activate the Flash Programmer action. Click the dedicated icon in order to start it.
Common Flash Programmer Features
The following sections describe common elements present in the flash programmer views.
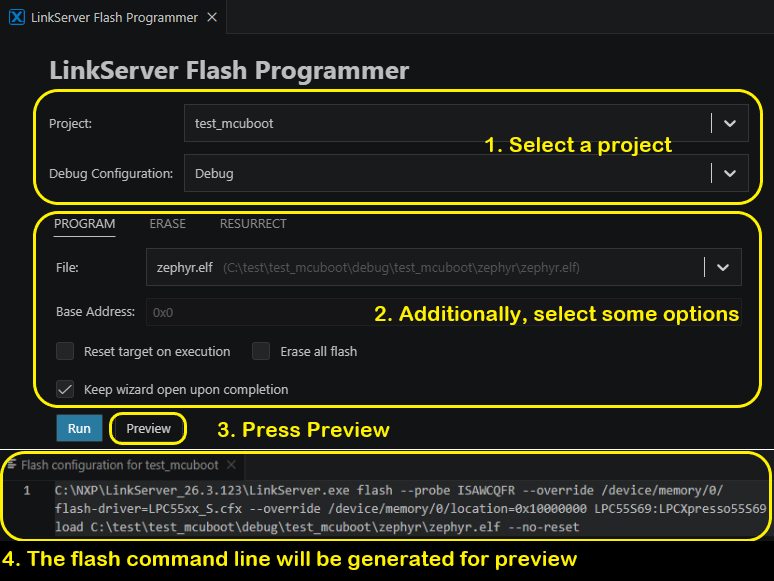
Project
All flash operations require a project to be selected using the dropdown at the top of the view.

Debug Configuration
The combo box displays all the MCUXpresso debug configuration names found in the launch.json for the selected project. Usually the same debug configuration used for debugging should be selected.
Flash operations require a debug configuration in order to select the probe serial number, as well as the device id and other probe type specific options which can be set using gdbServerConfigs.

Operation Tabs: Program | Erase | Resurrect
The main flash operation can be selected using the tabs after the project. The options presented afterwards change to accomodate each major operation.

Program
Program a file into flash. The available file formats depend on the probe type used. The extension will sometimes automatically convert the file into another format that is compatible with the probe type.
The file to be programmed is selected using the new dropdown selector (see File / Image Selection in the Program Tab below). If no file is selected and no build artifacts are found, the project’s default build target is used.
Note: For Zephyr and MCUXpresso SDK 24.12 or newer, the default image for flashing might be different than the one used for debugging. These projects also produce a binary file - which is used as the default file for flashing - but in some cases this file has been post-processed (e.g. signed for MCUboot).

If the probe type supports programming binary files, the “Base Address” field is also available and enabled when a single .bin file is selected. Binary files require specifying the base memory address where the file will be programmed.
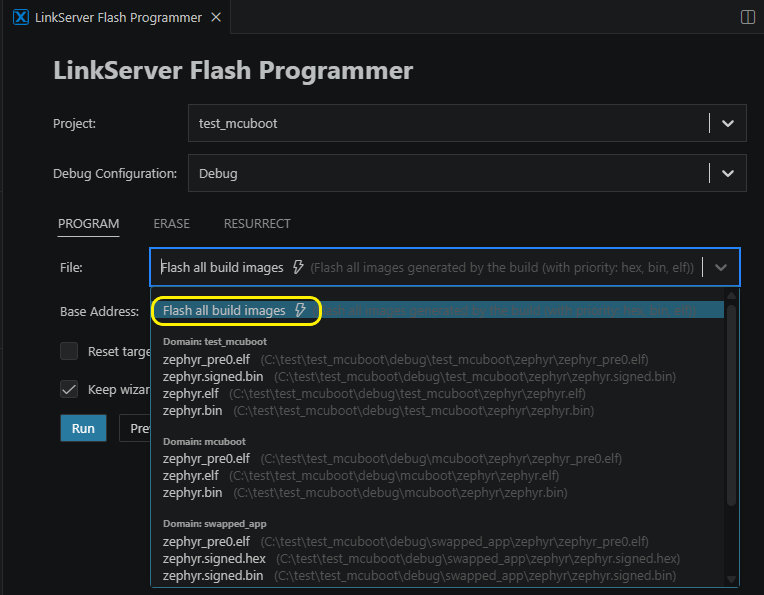
The Base Address field is automatically disabled when Flash all build images is selected. In this case, the base address for each binary image is determined automatically through the Kconfig in the domain’s build subdirectory by reading CONFIG_FLASH_BASE_ADDRESS (plus CONFIG_FLASH_LOAD_OFFSET when CONFIG_HAS_FLASH_LOAD_OFFSET=y).

Erase
Erase the flash. Each probe type might provide options affecting the way in which the flash is erased.
Resurrect
Attempt to unlock a Kinetis MCU by restoring the Flash Configuration field at offset 0x400.
Before running, the extension tries to check that the selected project uses a Kinetis device that can be resurrected. A warning is shown otherwise. Since the check is just a heuristic, the warning can sometimes be ignored.

Keep Wizard Open
If the “Keep wizard open upon completion” checkbox at the bottom is enabled, the flash programmer view remains open after Run / Preview.
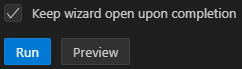
Note: the wizard will remain open regardless of this option if the operation fails.
Run
Clicking the Run button executes the selected flash operation with the configured settings. The raw flash command and its output are logged in the MCUXpresso for VS Code’s Output panel.
When Flash all build images is used, each image is listed separately in the output log with its file type, file name, domain name, and base address (if applicable). At the end, a notification displays the total number of images programmed.

Preview
The Command Preview allows dumping the actual commands used in the operation. The preview can be generated without having any probe or board connected and is useful in certain scenarios (e.g. debugging a failed flash operation).
The preview can be accessed by pressing the Preview button next to Run button. This will open a new read-only text editor window with the information used in the flash operation.
When Flash all build images is selected and a Segger J-Link probe is used, the preview contains a single consolidated J-Link commander script that covers all images in the correct order.
Note: Because the generated command line does not require a debug connection, the debug probe (see the <Insert Probe Serial here> field in the picture above) should be filled if the command will be executed on a real debug probe.
Specific options for each probe
LinkServer
PROGRAM
Reset Target on Execution: Reset target after programming.Erase all Flash: Mass Erase the flash before programming. When Flash all build images is used, this erase is applied only before programming the first image to avoid erasing already programmed data.
ERASE
Erase by sector: Erase sector by sector instead of using chip erase.
RESURRECT
PEmicro
Common
Interface: SWD or JTAG.Speed: Interface speed. You can input custom values to add them to the dropdown.
PROGRAM
Reset Target on Execution: Reset target after programming.Erase: Erase before programming. Recommended since it works for all cases. Not erasing would only work if the flash was previously erased.
ERASE
Segger
Common
Interface: SWD or JTAG.Speed: Interface speed. You can input custom values to add them to the dropdown.Additional Options(input field at the bottom): Arguments to append to the command line.
PROGRAM
Reset Target on Execution: Reset before flashing. When Flash all build images is used, this reset is applied after all images have been programmed (post-reset), not before each individual image.Halt Target on Execution: Halt before flashing.
ERASE
Erase all flash banks: Erase all the flash data.
RESURRECT
CUSTOM SCRIPT
Custom script: Execute the custom commander script entered in the text field.
Note: An “exit” command will be automatically added to the end of the script. This is mandatory in order for the J-Link process to terminate.
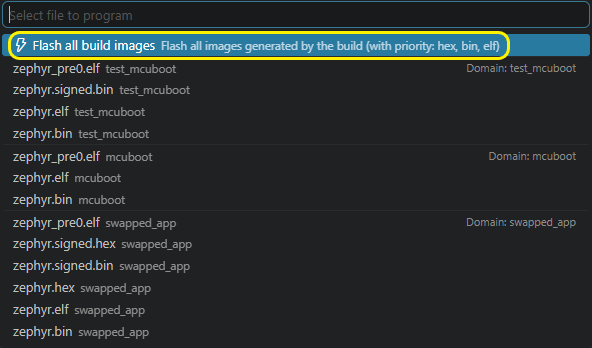
Flash All Build Images (Sysbuild / Multi-Domain Projects)
For multi-domain projects that produce more than one application image, an additional Flash all build images entry appears at the top of the file selection quick pick.
For Flash operation from Project Context Menu:
For Flash operation from Flash Programmer:
Selecting Flash all build images will:
Automatically detect all output targets defined in the project (in the order specified by the project’s
domain.yaml).For each domain/image, determine the best available file format to program, using the following priority: hex > bin > elf.
Program each image in sequence to the target.
Log each flashing step in the MCUXpresso for VS Code Output panel, showing the file type, file name, domain, and base address (when applicable).
Display a completion notification showing the total number of images successfully programmed (e.g., “Successfully programmed 2 file(s)”).
Note: The Flash all build images option is only shown when the project has more than one executable domain. For single-domain projects, only individual file selection is available.
Individual file entries are listed below the Flash all build images option, grouped by domain, allowing you to select and flash a specific image from a specific domain if needed.
Custom File / Image Selection in the Program Tab
In File selection of the Flash Programmer view, the last entry in the dropdown is the Browse… option (identified by a folder icon). Selecting it opens a standard file browser dialog, allowing you to select any file from the filesystem.
When a file is selected via Browse…, it is added to the dropdown list as a custom entry, and the dropdown switches to that file. The custom entry persists in the dropdown for as long as the same project is selected, so it can be re-selected without browsing again.
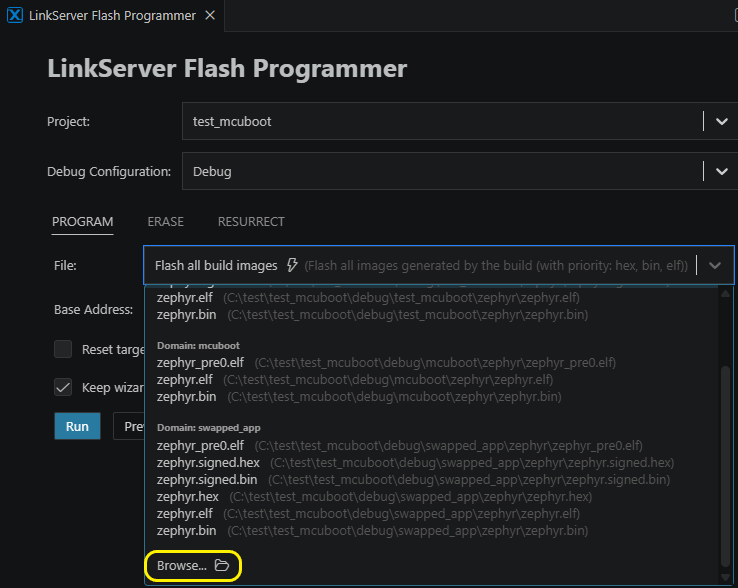
It is also possible to type or paste a file path directly into the dropdown’s search/input field. If the typed path is not already in the list, a “Use: <filename>” option will appear, which allows you to confirm and use the custom path.
The file selection is persistent per project. When switching between projects or re-opening the Flash Programmer, the last selected file or option (including Flash all build images) is restored for each project.